Your Tasks After Migration
Login to both sites:
- Login to your new migrated site by using the following url: https://uhtemp.aflcio.org
- Enter your email and the same password you have used on your current site.
- Once logged in, notice the My Sites that lists the sites where you are an admin.
- Select the site you want to work on and click the Title link.
- Once on your new migrated site…Open a second tab and navigate to your current site.
Review your sites logo, address and social properties:
- Compare the logo, address and social properties and ensure they are the same.
- To edit any of these items on your new migrated site, use the Manage menu and select Configuration.
- Logo and address are under the Site configuration menu.
- Social Properties are in the Social Media menu.
- Use the override toggle to enable editing if needed.
- There are other areas that can be customized, like site email and favicon if you would like to customize these.
Review the site menu:
- If you’re logged in on your current live site, log out to view the site as the public does to ensure any archived or unpublished content is not seen.
- Review the site's menu and note if any menu items are missing, out of order or listed under the incorrect parent menu item.
- To edit the site menu on your new migrated site, use the Manage menu and select Menu.
Review the Hero section, image, button and link
- If your hero image was custom (not syndicated by AFL-CIO) this will need to be updated to the hero you’d like to use on the new site.
- Collect the image, button text and the url for the button link by going to your current live site and clicking on the pencil to edit the site. Open the Branding menu and this information is in the Banner section.
- Login to your new migrated site and go to the home page.
- Select the Create menu and Add Hero.
- Complete the Add Hero form ensuring you toggle on the "Sticky at top of lists" and publish.
Review archived content that you want to keep:
- Use the following menu to access the content on your current live site - the Gear and Content.
- In the "Include archived content" option - select "Only archived content" and click Apply.

- Review any page in the resulting list that you may want to keep. This can be done by opening the page in a new tab with the Title link.
- If you'd like to keep the page, click the REMOVE FROM ARCHIVE button. The page will be migrated the following morning.
NOTE: This may result in the page being displayed in a listing for recent news as an example, but it’s likely way down the list. Once the next days migration has run you can archive the page again.
Review your site’s content audit:
- Ensure you've logged in to https://uhtemp.aflcio.org and go to your site.
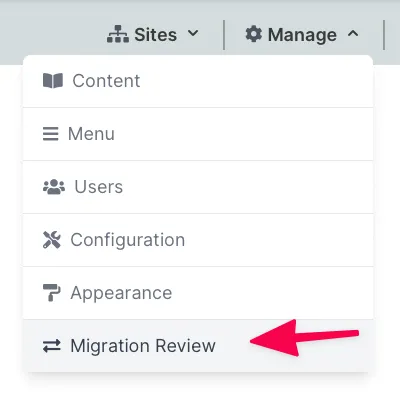
- Under the Manage menu, click Migration Review
- For each row you will be comparing the current live page with the migrated page. You’ll be working with 2 columns:
D7 Node (current live site) &
D9 Node (new migrated site).
NOTE: There may be 2 rows for the same page if it was flagged for having a different format (Panelizer) and having additional paragraph content added (Paragragh).
- To do this, open each link in a new tab and determine the following:
Is this a page I need to keep?
No - delete it from your live site and mark this row as reviewed.
Yes - Is there content that was not migrated?
No - mark this row as reviewed.
Yes - copy the content that was not migrated into the new page and mark this row as reviewed.
NOTE: Many of you were very creative in how you customized pages and may need more advanced options to duplicate what you had created. Every page has a Layout option when you click on Page Tasks. This Layout Builder will enable you to modify the page and add existing widgets like those that were available on your current site. (See Images Below)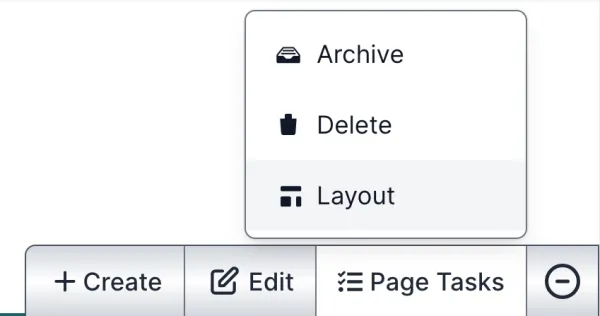
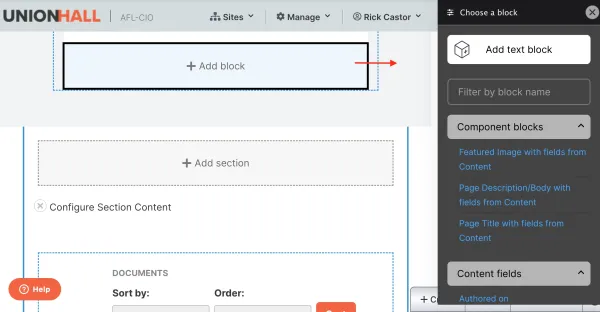
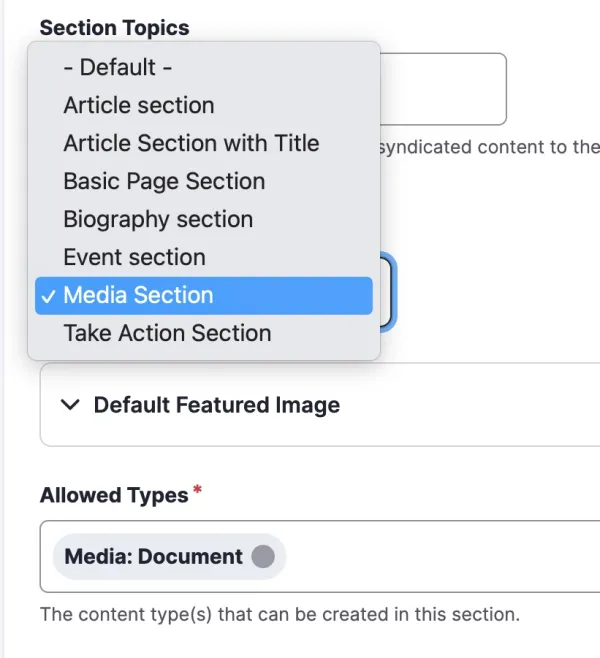
Did you have a Document or Photo listing?
- On your new site, select the Create menu and Add Section.
- Title your section and add any Body text you would like.
- In Layout - Select Media Section
- In Allowed Types - Select Media: Document or Media: Image depending on the listing you are creating. (See Image Below)
- Click Save
- Now you will have an option in your Create menu for the Media Type you allowed in step 4.